how to avoid swirl marks on black cars

What Causes Swirl Marks on Cars and How to Prevent Them

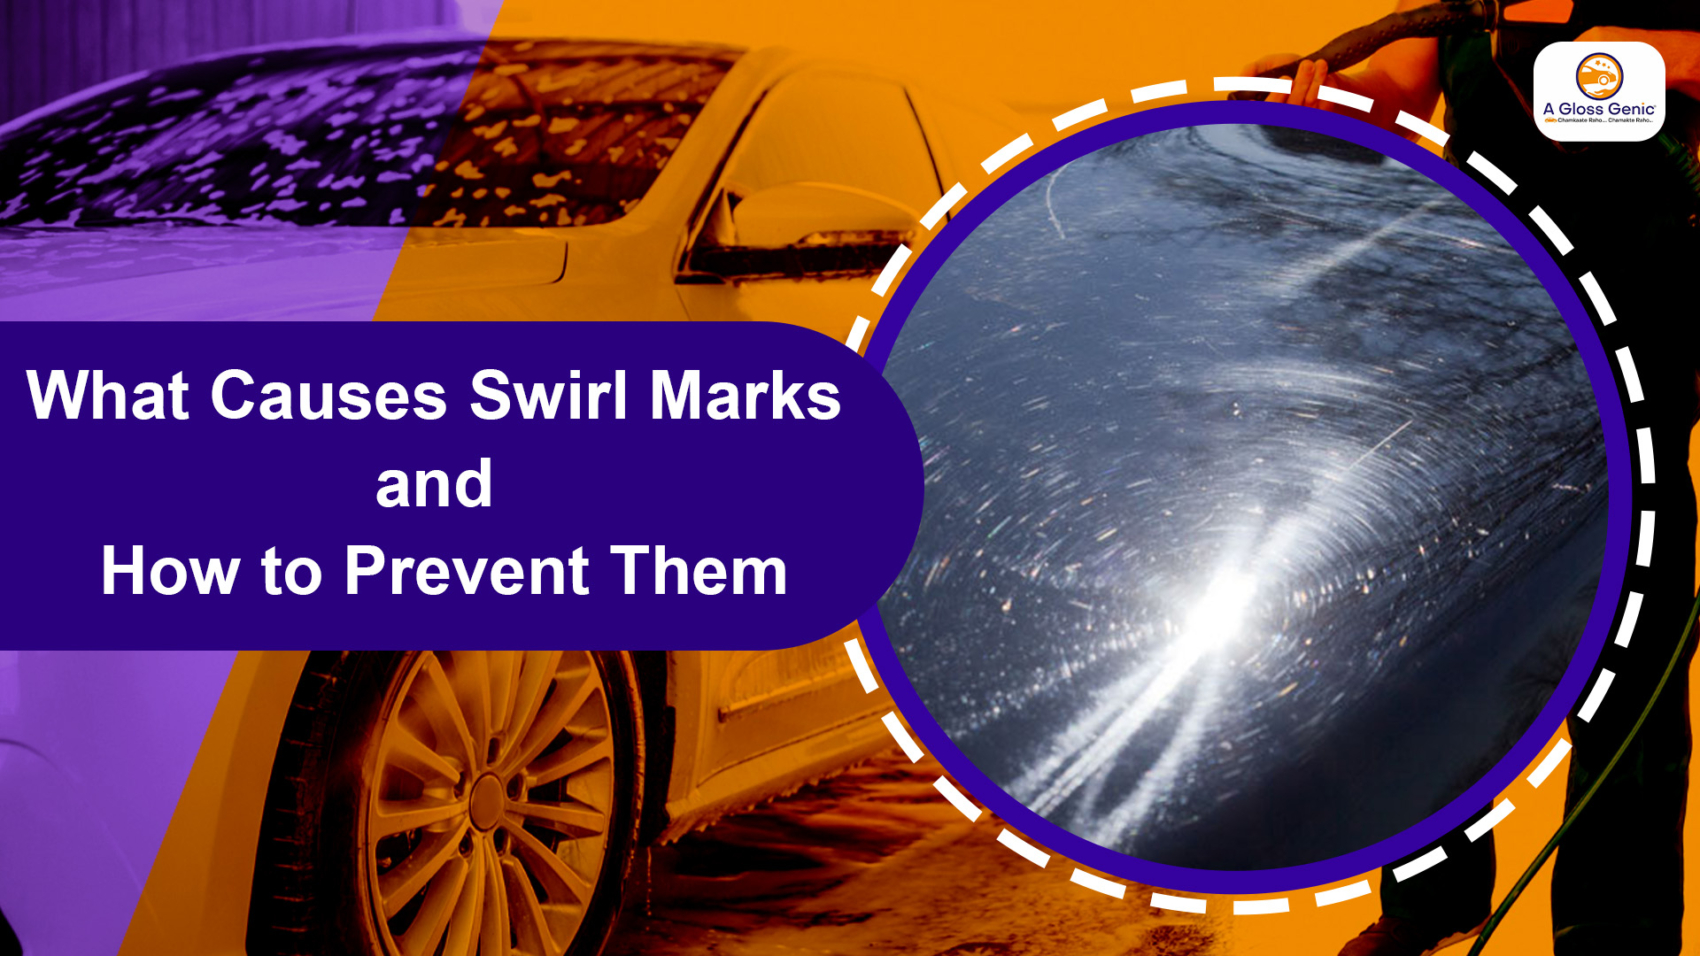
Swirl marks, which are those tiny, round dings on your car’s paint, can be annoying and detract from the car’s smooth, elegant appearance. Despite their benign appearance, they detract from the car’s gloss and could even lower its resale value.

What creates swirl markings on cars, and how may they be avoided? Let’s dissect this and learn how to maintain the brand-new appearance of your car’s paint.

What Are Swirl Marks on a Car?

Swirl marks are light scratches or micro-marring in the clear coat of a car’s paint. They appear as circular patterns, the most visible under direct sunlight or bright lights. Though any car can have swirl marks on it, they’re more so visible on a dark-colored vehicle, thus making it even more important to learn methods of avoiding swirl marks on black cars.

Common Causes of Swirl Marks

  1. Improper Washing Techniques
    • Using dirty or abrasive sponges, coarse towels, or stiff brushes leave tiny scratches on your car’s surface.
    • Circular washing motions can lead to the formation of swirl marks.
  2. Automatic Car Washes
    • Most automatic car washes use stiff brushes that trap dirt and debris inside, which can scratch the paint.
    • Frequent visits to low-quality car washes significantly increase the risk of swirl marks on car.
  3. Dry Wiping the Surface
    • Wiping your car when it’s dry, especially with a dirty cloth, can cause scratches.
    • Always use a clean, damp microfiber towel for safe wiping.
  4. Contaminants During Polishing or Waxing
    • Polishing or waxing with contaminated pads or applicators can embed debris into the paint.
    • Incorrect use of a polishing machine can also create swirl marks.
  5. Harsh Weather Conditions
    • Dust, sand, and other environmental particles can scratch the paint when blown around by the wind.
    • Rainwater mixed with dirt can dry into abrasive particles.

How to Prevent Swirl Marks on Your Car

Preventing swirl marks on car requires adopting safe washing and maintenance practices. Here are some key tips:

1. Wash Your Car Properly

A proper car wash is your first line of defense against swirl marks. Here’s how you can wash your car safely:

  • Use the Two-Bucket Method – One bucket for soapy water and the other for rinsing your wash mitt. This reduces the chances of transferring dirt back onto the car’s surface.
  • Choose a High-Quality Wash Mitt – Avoid sponges and use a microfiber wash mitt to minimize scratches.
  • Avoid Circular Motions – Wash and dry in straight lines to reduce the risk of swirl marks.

2. Use Proper Drying Techniques

Incorrect drying can undo all your careful washing efforts.

  • Avoid Air-Drying – Air-drying leaves behind water spots that can cause micro-abrasions. So void Air- Drying
  • Use a Microfiber Towel – Choose a soft microfiber towel to dry your car gently without scratching.
  • Blot instead of Rubbing – Gently blot the surface with the towel as you dry..

3. Be Careful with Automatic Car Washes

If you must use an automatic car wash, choose one that offers touchless washing to avoid abrasive brushes. While touchless washes aren’t perfect, they are much gentler on your paint.

4. Regularly Apply Wax or Ceramic Coating

Waxing or applying a ceramic coating forms a protective layer over your car’s paint, reducing the chances of swirl marks.

  • Wax Every 3–4 Months – This helps protect your car from contaminants.
  • Consider a Professional Ceramic Coating – It offers long-lasting protection and reduces the risk of swirl marks on car.

5. Use High-Quality Detailing Products

Cheap products can do more harm than good. Invest in quality shampoos, waxes, and polishes designed to protect your paint.

How to Avoid Swirl Marks on Black Cars

Dark-colored vehicles, especially black ones, show every imperfection. Here’s how to give extra care to black cars:

  1. Use Foam Pre-Wash – Loosen dirt and grime before hand-washing to minimize the chances of scratching.
  2. Invest in a Quality Microfiber Drying Towel – Ordinary towels can create swirl marks. Use microfiber towels specifically designed for drying.
  3. Inspect and Clean Wash Mitts Regularly – Dirty wash mitts can be your worst enemy. Clean them after every use.
  4. Park in Covered Areas – Reduce exposure to harsh weather and airborne contaminants.

By following these steps, you’ll significantly reduce the risk of swirl marks on black cars and maintain a mirror-like finish.

How to Prevent Swirl Marks on a Car Long-Term

If you’re looking for long-term protection, consider professional services like paint correction and protection coatings. During paint correction, existing swirl marks are removed, and protection coating provides longevity in future scratches.

Paint Protection Film (PPF)

PPF is a clear film that protects your car against scratches, swirl marks, and road debris.

Professional Ceramic Coating

Ceramic coatings have properties that repel water, dirt, and other types of contaminants-this makes it easier to maintain a swirl-free finish.

DIY or Hire a Professional?

While you can minimize swirl marks on your own, nothing beats a professional detailer. Usually, the do-it-yourself method might worsen the problem, especially on a dark finish, if executed poorly.

If you are dedicated to keeping an immaculate swirl-free finish, let the professionals do their work. They have all the tools and techniques as well as the know-how required to properly protect the paint finish of your vehicle.

Keep Your Car Looking Flawless with Glossgenic!

Tired of swirl marks stealing the shine from your car? Call Glossgenic today for professional care and preventive solutions to keep your vehicle’s finish looking good. From professional detailing services to advice on preventing swirl marks on cars, we have your needs covered!

car paint correction

Signs Your Car Needs Paint Correction Services

Does the once-glossy finish of your car now appear dull? A multitude of factors can compromise a given vehicle’s paint throughout time. Recognizing the signs that tell you it is about time to book car paint correction services can help restore your vehicle’s beauty and, consequently, its worth. Thus, let us examine the classic signs that should trigger the consideration for professional car paint correction.

1. Swirl Marks and Fine Scratches

Swirl marks are those annoying little spider web-like scratches that become especially visible under direct sunlight or bright lighting. Often resulting from improper washing techniques or using abrasive materials, these imperfections can dull your car’s appearance. Professional car detailing paint correction can effectively remove these blemishes, bringing back a flawless finish.

2. Oxidation Leading to Faded Paint

Oxidation sets in when the paint of your car comes into contact with the environment, fading it and diminishing its shine. This makes the finish appear dull and chalky. So if the color of your car looks washed out, it clearly calls for car paint correction to enhance its charm.

3. Water Spots and Etching

Indeed, it is a rather frustrating situation when some water droplets form stains after rain or washing since they leave mineral deposits once the water evaporates. These water spots can build up and eventually etch into the clear coat as time passes and cause more or less permanent damage. Addressing these issues promptly with car paint correction can prevent long-term harm to your vehicle’s finish.

4. Bird Droppings, Tree Sap, and Other Contaminants

Environmental contaminants such as bird droppings and tree sap are not only ugly, but also acidic and may eat into your car paint if not removed immediately. If these contaminants have left stains or etched into the paint, professional car detailing paint correction services can help eliminate them and restore the surface.

5. Holograms and Buffer Trails

Holograms or buffing trails can occur when machine polishers have been improperly used. These circular patterns detract from paint appearance and are usually caused by amateur detailing attempts. With proper car paint correction, these flaws can be removed for an even and glossy finish.

6. Fading and Discoloration

Exposure to UV rays can cause your car’s paint to fade or discolor over time. If certain areas of your vehicle appear lighter or have a different hue, it’s a sign that the paint’s integrity has been compromised. Car paint correction can address these issues, restoring uniformity and depth to the color.

7. Surface Contaminants You Can Feel

UV rays can invariably make your car’s paint fade or discolor with time. If some spots in your car appear to be lighter or a different shade from the rest, it is a sign that the paint integrity might have been compromised. Car paint correction can address these problems and make the color even and deep again.

8. Dullness Despite Regular Washing

If your car looks dull and lifeless, even after a complete wash, then the problem may run deeper than just surface dirt. Over time, microscopic scratches and oxidation can impact the reflectivity of the paint.

9. Peeling or Chipping Clear Coat

The clear coat protects the paint on your car. The peeling or chipping of this layer is bad since it not only looks unsightly but also exposes the paint underneath to damage. Paint correction done quickly can stop further degradation and avoid costly repairs.

10. Preparing for Sale or Show

Placing a premium on first impressions, a flawless and glistening-looking vehicle sells for more and garners more admiration. A worthy investment, car paint correction will allow your car to attain the very best of its looks, which only means that it will be sellable and attractive.


How to Do Paint Correction on a Car?

If you’re wondering how to do paint correction on a car, the process typically involves:

  1. Thorough Washing & Decontamination – Removing dirt, tar, and embedded particles.
  2. Claying the Surface – Using a clay bar to remove bonded contaminants.
  3. Compounding & Polishing – Correcting swirl marks, oxidation, and deeper scratches.
  4. Sealing & Protecting – Applying a wax or ceramic coating to maintain the finish.

For best results, especially if you own a dark-colored vehicle and are looking for tips on how to paint correction black car, professional services ensure an even finish without introducing more scratches.

For Glossgenic, every little detail of your car notwithstanding will be respected with a showroom shine for years.

Any hint of these signs gives your car a deserving treatment. Call Glossgenic for a consultation to learn how paint correction can clean up your ride. We will restore the sparkle in your vehicle!

how to clean car headlight glass

How to Clean Car Headlight Glass Like a Pro

Foggy or yellowed headlights don’t just age your car’s appearance, they can also compromise your safety by reducing visibility at night or during bad weather. Thankfully, restoring your car headlight glass to its original clarity is easier than you might think. In this guide, we’ll show you how to clean car headlight glass like a pro using simple methods and tools.

Why Do Headlights Become Foggy?

Over time, exposure to UV rays, dirt, and chemicals can cause the outer layer of your headlight glass to oxidize. This oxidation results in the cloudy or yellow appearance that diminishes your headlights’ effectiveness. Learning how to clean headlight glass regularly can prevent long-term damage and maintain their brightness.

Step-by-Step Guide to Clean Your Car Headlights

Follow these steps to restore your car headlight glass to its original clarity:

Step 1: Gather Your Supplies

You’ll need the following items:

  • Microfiber cloths
  • Masking tape
  • Mild car soap and water
  • Sandpaper (optional)
  • Toothpaste or a headlight cleaning kit
  • UV sealant

Step 2: Wash the Headlights

Start by washing the car headlight glass with soapy water to remove dirt and debris. Dry thoroughly with a microfiber cloth.

Step 3: Protect the Surrounding Area

Use masking tape to cover the area around your headlights. This prevents accidental damage to your car’s paint during the cleaning process.

Step 4: Apply a Cleaning Agent

For light fogging, apply toothpaste onto the headlight glass and rub in circular motions using a soft cloth. For more severe cases, consider using a specialized headlight restoration kit.

Step 5: Rinse and Dry

Once you’ve cleaned the car headlight glass, rinse with water and dry with a clean microfiber cloth. Repeat the process if needed.

Step 6: Sand and Polish (Optional)

For deeply oxidized headlights, wet-sanding may be necessary. Use fine-grit sandpaper and water to gently sand the surface of the headlight glass, then polish with a suitable compound.

Step 7: Apply UV Sealant

Finish by applying a UV sealant to protect the car headlight glass from future oxidation and discoloration.

Tips for Maintaining Clear Headlights

  • Clean your headlights regularly using mild soap and water.
  • Park in shaded areas or use a car cover to minimize UV exposure.
  • Apply a UV protectant periodically to extend the clarity of your headlight glass.

By following these steps, you’ll not only improve the appearance of your vehicle but also enhance your safety on the road. Now you know how to clean car headlight glass like a professional and keep them shining bright! If you prefer a hassle-free solution, Glossgenic offers professional headlight restoration along with a range of auto detailing services. Visit Glossgenic today to give your car the expert care it deserves and drive with confidence!